I needed to reference the column heading for each row based on the max value of a series of columns. This post on the Ozgrid Excel Help & Best Practices Forums provided the quick answer using the INDEX & MATCH functions. http://www.ozgrid.com/forum/showthread.php?t=67827&page=1
Shows how to reference the value of the row (or column) headings in a matrix at which a maximum value in each row (or column) of the matrix is located.
Showing posts with label Technical tips. Show all posts
Showing posts with label Technical tips. Show all posts
Saturday, September 11, 2010


Thursday, September 9, 2010
Recovered lost password for MS Outlook 2007 .pst file with pstpassword 1.12 from nirsoft
I had success with pstpassword 1.12 recovering my lost password on an Outlook 2007 .pst file!
How I got in this situation in the first place: My backup program was generating errors related to an Outlook email archive, so my system admin advised me to close the archive to try to resolve the problem. Oops! I didn't think to reset the password on the pst file before closing it.
With a company policy that requires changing passwords every few months and at least one upper case, lower case number and special character, and being admonished, don't write down your passwords, the odds of me remembering the password on an email archive I created over a year ago were slim and none. So there I was stuck with all my 2010 emails through July locked just out of reach.
I went looking online for a freeware password recovery tool for Outlook and found plenty of commercial offers and dubious looking claims, but pstpassword 1.12 from nirsoft.com seemed to stand out from the noise. After extensive searching, I couldn't find anything really bad about it. There were some discussion on a PCReview forum in the UK about it being tagged as a false Trojan. The discussion made sense to me, so I downloaded it (on my home PC). I made a copy of the .pst file on my portable USB drive and was able to run pstpassword against it (after extensive scanning the download with antimalware and antivirus programs).
It quickly gave me three passwords to try against the file. The first one looked like part of an old password that I might have used, but didn't work. The 2nd didn't work at all, but the third opened it right up. I copied the emails out of the old archive to a new one and I'm back in business. And now that I know how easy it is to crack the passwords on an email archive. Don't think you can hide something in there that you don't want found out!
So I'm satisfied. I wanted to document this so hopefully people will find it assuring that a real person found pstpassword 1.12 performed as described for me.
How I got in this situation in the first place: My backup program was generating errors related to an Outlook email archive, so my system admin advised me to close the archive to try to resolve the problem. Oops! I didn't think to reset the password on the pst file before closing it.
With a company policy that requires changing passwords every few months and at least one upper case, lower case number and special character, and being admonished, don't write down your passwords, the odds of me remembering the password on an email archive I created over a year ago were slim and none. So there I was stuck with all my 2010 emails through July locked just out of reach.
I went looking online for a freeware password recovery tool for Outlook and found plenty of commercial offers and dubious looking claims, but pstpassword 1.12 from nirsoft.com seemed to stand out from the noise. After extensive searching, I couldn't find anything really bad about it. There were some discussion on a PCReview forum in the UK about it being tagged as a false Trojan. The discussion made sense to me, so I downloaded it (on my home PC). I made a copy of the .pst file on my portable USB drive and was able to run pstpassword against it (after extensive scanning the download with antimalware and antivirus programs).
It quickly gave me three passwords to try against the file. The first one looked like part of an old password that I might have used, but didn't work. The 2nd didn't work at all, but the third opened it right up. I copied the emails out of the old archive to a new one and I'm back in business. And now that I know how easy it is to crack the passwords on an email archive. Don't think you can hide something in there that you don't want found out!
So I'm satisfied. I wanted to document this so hopefully people will find it assuring that a real person found pstpassword 1.12 performed as described for me.
Monday, March 22, 2010
MS Excel 2007 Pivot Table Quick Reference
PivotTable I: Get started with PivotTable reports in Excel 2007
Overview of PivotTable reports and PivotChart reports
Design the layout and format of a PivotTable report
Select different source data for a PivotTable report
Group items in a PivotTable report
Connect to (import) external data
Connect to (import) an OLAP database
PivotTable II: Filter PivotTable report data in Excel 2007
Overview of PivotTable reports and PivotChart reports
Design the layout and format of a PivotTable report
Select different source data for a PivotTable report
Group items in a PivotTable report
Connect to (import) external data
Connect to (import) an OLAP database
PivotTable II: Filter PivotTable report data in Excel 2007
Saturday, January 3, 2009
Adobe Reader 9: how to turn off updates
As part of my annual home PC clean-up, I upgraded to a 320 Gb drive and started from a fresh OS install to clear up all of the junk that slows things down. I was really tickled that the old machine was practically jumping off the desk after I installed Windows XP, MS Office, and my video editing software, but when I re-installed Adobe Reader 7.0, the performance fell off a cliff. I hadn't realized that Adobe Reader 7.0 was checking the web for updates every time it started causing my machine to become unresponsive whenever it opened.
I did a little reading on the web and didn't find an easy way to turn off the updates. After seeing a few helpful notes on various forums, (this tweak in particular stands out) I saw some favorable feedback on 9.0, although there are still complaints about bloat. Adobe added the ability to update preferences in Reader 9.0, which didn't exist in Reader 7, so I decided to give 9 a try. To disable updates, click edit, preferences, general, then remove the check mark from "Check for Updates" under Application start up. With automatic updates disabled, you can still Check for Updates manually by clicking on the Help menu. Here is a composite screenshot showing the setting to disable updates for anyone who needs a clear picture.
I did a little reading on the web and didn't find an easy way to turn off the updates. After seeing a few helpful notes on various forums, (this tweak in particular stands out) I saw some favorable feedback on 9.0, although there are still complaints about bloat. Adobe added the ability to update preferences in Reader 9.0, which didn't exist in Reader 7, so I decided to give 9 a try. To disable updates, click edit, preferences, general, then remove the check mark from "Check for Updates" under Application start up. With automatic updates disabled, you can still Check for Updates manually by clicking on the Help menu. Here is a composite screenshot showing the setting to disable updates for anyone who needs a clear picture.

I'm very pleased with the result (I also disabled Adobe Java Script as recommended in the above tweak link above. (click: edit, preferences, javascript, remove check mark, click OK.)
PS. After the original post, I learned the same preference is also in Adobe Reader 8.
Happy New Year,
Chuck
Tuesday, January 22, 2008
What is a wiki?
Seth Godin blogged recently about a shortage of digital coaches. While I'm not a digital coach, I've been told I do a good job of boiling down a lot of information to explain complicated topics to non-experts. I maintain a website for my church, which includes a wiki, where other parishioners contribute content without any direct involvement from me. I received an email earlier this week from someone in the parish asking me, "what is a wiki?" After a quick search of the web- including wikipedia, I thought this would be a good topic for a blog.
The term wiki derives from the Hawaiian word for "fast." A wiki enables web pages and documents to be written collaboratively using a web browser without any specialized training or software. A single page in a wiki is referred to as a "wiki page", while the entire collection of pages, which are usually well interconnected by hyperlinks, is "the wiki". A wiki is essentially a database for creating, maintaining, browsing, and searching through information. A defining characteristic of wiki technology is the ease with which pages can be created and updated. Generally, there is no review before modifications are accepted.
Wikis allow visitors to create, modify or delete the content of a web page from their browser, and usually record the history of who changed what. Wikis enable creation of collaborative community websites, and are trending toward eliminating the need for specialized skills and software to create and edit content on a web page.
The administrator of the Wiki decides who is allowed to modify the site. Some wikis are open to changes by anyone, others limit modifications to trusted members, and some use moderators to arbitrate disagreements. The Wikipedia free encyclopedia is the best known Wiki, where hundreds of thousands of users add to the collective knowledge. where hundreds of thousands of users add to the collective knowledge. On Wikipedia, an entry started by one person is often iteratively refined by other contributors who collaborate to produce a consensus.
Regards,
Chuck
The term wiki derives from the Hawaiian word for "fast." A wiki enables web pages and documents to be written collaboratively using a web browser without any specialized training or software. A single page in a wiki is referred to as a "wiki page", while the entire collection of pages, which are usually well interconnected by hyperlinks, is "the wiki". A wiki is essentially a database for creating, maintaining, browsing, and searching through information. A defining characteristic of wiki technology is the ease with which pages can be created and updated. Generally, there is no review before modifications are accepted.
Wikis allow visitors to create, modify or delete the content of a web page from their browser, and usually record the history of who changed what. Wikis enable creation of collaborative community websites, and are trending toward eliminating the need for specialized skills and software to create and edit content on a web page.
The administrator of the Wiki decides who is allowed to modify the site. Some wikis are open to changes by anyone, others limit modifications to trusted members, and some use moderators to arbitrate disagreements. The Wikipedia free encyclopedia is the best known Wiki, where hundreds of thousands of users add to the collective knowledge. where hundreds of thousands of users add to the collective knowledge. On Wikipedia, an entry started by one person is often iteratively refined by other contributors who collaborate to produce a consensus.
Regards,
Chuck
Wednesday, March 7, 2007
How to syndicate a feed using Feedburner & Blogger
 Feedburner provides free and easy to use tools that integrate with Blogger to create RSS feeds [Really Simple Syndication] that allow subscribers to view your blog in an aggregator or feed reader. If you need it, this article from TechCrunch will help beginners understand the popular options for online feed readers.
 Bloglines:
Sunday, January 28, 2007
Free software to securely wipe any IDE hardrive for disposal
Prevent Identity theft from old hard drives:
Autoclave - hard drive sterilization on a bootable floppy:
Detailed instructions
Downloading/Installation Instructions Go here to download Autoclave
Usage Instructions See what Autoclave looks like when it's running
Quick steps: If you already have a bootable floppy with Autoclave, skip to step 3.
Detailed instructions
Downloading/Installation Instructions Go here to download Autoclave
Usage Instructions See what Autoclave looks like when it's running
Quick steps: If you already have a bootable floppy with Autoclave, skip to step 3.
1. Download and extract clafe03.img & rawwrite.exe from the zip archive
2. Run rawrite from a command prompt to create a bootable floppy containing autoclave. rawrite will prompt you for the name of the image and the floppy name as shown below.
C:\My Documents\tmp>dir
Directory of C:\My Documents\tmp
01/28/2007 01:16 PM
01/28/2007 01:16 PM ..
04/09/2002 12:58 PM 1,474,560 clave03.img
07/28/1996 12:58 PM 14,305 rawrite.exe
2 File(s) 1,488,865 bytes
2 Dir(s) 24,516,186,112 bytes free
C:\My Documents\tmp>rawrite
Enter disk image source file name: clave03.img
Enter target diskette drive: a:
Please insert a formatted diskette into drive A: and press -ENTER- :
C:\My Documents\tmp>a:
A:\>dir
Directory of A:\
04/09/2002 12:58 PM 1,163 boot.msg
04/09/2002 12:58 PM 479,737 initrd.gz
04/09/2002 12:58 PM 1,195 legal.msg
04/09/2002 12:58 PM 18,009 LICENSE.TXT
04/09/2002 12:58 PM 1,271 other.msg
04/09/2002 12:58 PM 165 syslinux.cfg
04/09/2002 12:58 PM 629,389 vmlinuz
04/09/2002 12:58 PM 7,060 LDLINUX.SYS
8 File(s) 1,137,989 bytes
0 Dir(s) 317,440 bytes free
3. Boot the computer with the drive to be erased using the Autoclave floppy. 
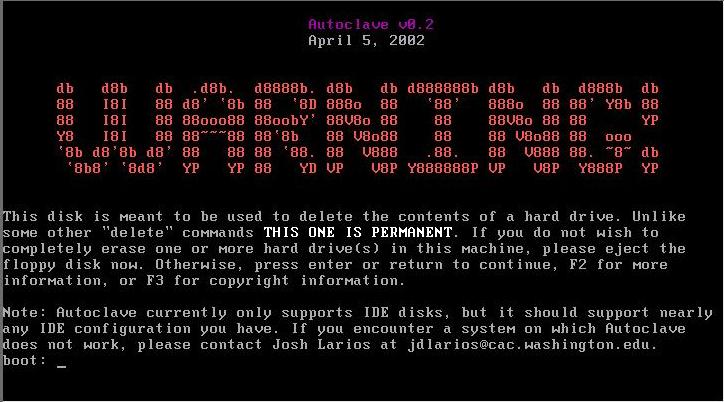
The initial warning is followed by a request to confirm you want to proceed to DESTROY all data on the selected disk(s). To continue, you must type "I understand.", including the period but not including the quotation marks. This is to make sure you know that using Autoclave is irreversible.
4. Once you've confirmed that you understand the consequences, you should see a list of drives Autoclave has found in the computer: Enter a number to select the drive to wipe. Instructions to wipe more than one drive are covered at the end. For now, enter a single digit number to select a drive. When there is only one drive, so you would type "1" and hit return. If there were multiple drives, you could choose between them.
5. After you've chosen a drive, Autoclave will ask you how securely you wish to erase it. All of the options are slow. Option 3 is sufficient to prevent access to any proprietary business records that might have been stored on the disk and will keep prying eyes from getting at your personal documents, emails, bank account or credit card information that you may have stored on your computer.
6. If you have more than one hard drive in the machine to erase, follow steps 3-5 for the first drive. Once the first drive is being erased, type alt-F2 (hold down the "alt" key and press the "f2" key). You should be returned to step 2, and you'll have to type "I understand." again. Follow the steps again, but this time choose a different drive than the one you chose the first time. You should be aware that it's possible to choose the same drive you chose last time,don't try that. It won't complain about trying to use the same drive twice-and will slow the process down incredibly. If you have yet another drive, hit alt-f3 to get another return to step 2. alt-f4 will get you another, and alt-f5 yet another. Autoclave only allows up to 5 drives. To check on the status of drives being erased other than the one currently being displayed, press alt-F1 through alt-F5 to go back and forth beteween screens.
Regards,
Chuck
Subscribe to:
Posts (Atom)